articles
Thanks!

rustdoc is the Rust tool used to generate documentation based on your source code. Whenever you use cargo doc or browse documentation on docs.rs, the content you see was generated using the rustdoc tool. In this blog post, we will see how rustdoc is tested. It's actually into two main parts, the unit tests on one side and the test suites on the other.
Let's start by something very common in Rust: unit tests using #[test]. At the time I'm writing this blog post, we currently have 89 of them (counted them by doing git grep '\#\[test\]' | wc -l). But what are they testing exactly? We can split them into the following categories:
#[cfg(...)] conditions (if you don't know what it is, you can check it here).Run/// a
#[doc = "b"]
/// c
/// d
pub struct Foo;
Should we collapse everything to remove the extra whitespace at the beginning of each line except for #[doc = "b"]? The answer is... it's complicated. If you're interested to know more about this, I wrote a blog post about it here.
Run/// ```
/// assert_eq!(2+2, 4);
/// ```
will become:
Run#![allow(unused)]
fn main() {
assert_eq!(2+2, 4);
}
But then what happens if users add a main function or use inner attributes (ie #![...])? These tests are here to check that.
12345678 will become 12_345_678. It makes reading big numbers much easier and pleasant. We ensure it isn't longer than a given length and that some HTML elements are not generated into it (would be strange to have a full table inside a short doc comment for example).
Run/// ```rust,ignore (whatever)
You can find more information about them in the rustdoc book.
a::b::c and targetting an element in a::b, by default we would generate ../../b/element. Whereas we should generate ../b/element. It allows to have lighter HTML content.--check-theme option, ensuring that all themes have at least the same set of CSS rules as light.css) is working as expected.There are 6 different test suites to test the different parts of rustdoc:
rustdocrustdoc-uirustdoc-guirustdoc-jsrustdoc-js-stdrustdoc-jsonLet's go through them.
This test suite checks the generated "appearance" of the documentation. Through the years, we had many regressions and unintended GUI/UX changes and at some point, we decided to create this test suite to prevent that.
Originally, we did this check based on screenshots. However, that didn't work at all, mostly because font rendering varies a little bit between all platforms. So depending where you were running the tests, you got a slightly different result. So the font rendering was removed (which reduced a bit the interest for this test suite). But then another problem arose: it was actually quite difficult to notice where the change(s) happened by comparing images.
So this approach was dropped and instead I looked how websites were checking their UIs. Most of them were relying on puppeteer or selenium. However, writing tests with these frameworks was actually requiring a lot of knowledge on how websites front-end work and also how the frameworks itself work. So I looked if there was a framework which had a much simpler syntax to achieve this goal. Unfortunately, I didn't find anything conclusive, so I decided to write my own: browser-ui-test. It is based on puppeteer so it needs JS to run but you never need to write any JS yourself.
So let's look what a test file looks like (taking test/rustdoc-gui/basic-code.goml):
// Small test to ensure the "src-line-numbers" element is only present once on
// the page.
go-to: "file://" + |DOC_PATH| + "/test_docs/index.html"
click: ".srclink"
wait-for: ".src-line-numbers"
assert-count: (".src-line-numbers", 1)
The first two lines are comments, nothing special there. The fun starts on this line:
go-to: "file://" + |DOC_PATH| + "/test_docs/index.html"The goml format expects a command, ended with : followed by its arguments (if any).
The go-to command takes the URL you want to load. You can concatenate elements (strings here). |DOC_PATH| is a variable. It supports booleans, numbers, strings, arrays, tuples and JSON dictionaries. There is also support for functions.
And with this, you know pretty much everything there is to know about this format. The command list is available here.
We currently have 106 rustdoc-gui tests.
This test suite allows to check DOM content with XPATH queries. A test looks like this:
Run#![crate_name = "foo"]

// @has 'foo/trait.Foo.html'
// @has - '//*[@id="main-content"]//*[@class="code-header"]' 'fn test()'

// @has 'foo/index.html'
// @count - '//*[@class="item-table"]//*[@class="trait"]' 1
// @has - '//*[@class="item-table"]//*[@class="trait"]' 'Foo'

pub trait Foo {
    fn test();
}
#[doc(hidden)]
pub trait Hidden;
So one thing to note before diving into it: #![crate_name = "foo"] is often used to rename the crate foo because by default it takes the name of the entry file. Another advantage to this approach is that, if you renamed the file, the crate name will not change, so no need to update the file paths in your tests.
Now let's explain what's going on in here: checks are inside code comments and start with @. So @has is the command here. It is then followed by a file name. In this case, we want to check the file containing the Foo trait, located into foo/trait.Foo.html.
This command can also take two more arguments: the XPATH of the item we're looking for and the text content of this item. So let's look at the next line:
Run// @has - '//*[@id="main-content"]//*[@class="code-header"]' 'fn test()'
The first argument this time isn't the file name but -. It's a short-hand we added to prevent having to rewrite the same file name over and over. - means "same file as the previous command".
Then we have '//*[@id="main-content"]//*[@class="code-header"]'. So we're looking for any item with a id attribute with the value main-content. Then we look for any child of this item with the class attribute of code-header. And finally, we check that the item matching the XPATH has the expected content. If not, we look into the other matching items.
@has, like all commands, has a variant: @!has. It checks that a given XPATH doesn't exist or doesn't contain the given text or if a file doesn't exist. However, through the years we realized that using this check wasn't great because it's easy to introduce changes (potentially leading to regressions) that aren't detected by this check. For example if you change the DOM, the test will still not find the new XPATH but the item might actually exist. You just can't detect it because the purpose of this check is to ensure that a specific XPATH doesn't contain a given text or that a file doesn't exist, which is still true. To go around this problem, we introduced other commands, like @count.
@count is very similar to @has: it expects a file name as first argument, then a XPATH, a text and finally a number. The text argument is optional though, then in that case it counts the number of elements matching the given XPATH without checking the text.
So how does it help in our case? In the code above, we check that there is only one trait listed on the index page. We could also check if the trait was not generated by checking if its file doesn't exist:
Run// @!has 'foo/trait.Hidden.html'
... But then we have the problem mentioned previously: if the file scheme is changed, this test will continue to succeed even if Hidden file is generated. However, just using @count alone is not enough. Better ensure that the only displayed item is Foo. Which is why there is:
Run// @has - '//*[@class="item-table"]//*[@class="trait"]' 'Foo'
So we checked that there was only one trait displayed and that this trait's name was Foo. With this, no change can go unnoticed. If suddenly Hidden is displayed, @count will fail and if we change the DOM, both @has and @count will fail.
Another similar command to @has is @matches: no optional argument and the last argument is a regex string:
Run// @matches - '//*[@class="stab portability"]' '^ratel$'
Very convenient in case we only want to check if an item's text only contain a specific text without having to match against the whole content.
And finally we have @snapshot. It takes three parameters: the file name to use for the "snapshot", the file name we're looking into (like all other commands) and the XPATH of the element we want to "snapshot":
Run// // @snapshot no_const_anchor2 - '//*[@id="associatedconstant.X"]'
The "snapshot" is the exact HTML content of the given XPATH. We started using it a lot more when we worked on reducing the DOM size to ensure there was no regression. Again, a lot about this work is listed here.
And finally there are @hasraw and @matchesraw commands. The only difference with the non-raw commands is that they don't take an XPATH argument and look for the given text/regex directly into the HTML content. So you can look for things like:
Run// @has - '<a href="trait" href="./trait.Foo.html">Foo</'
Apart from all these commands, in some cases we just use these tests to ensure rustdoc doesn't crash, meaning they contain no command, just Rust code. If it didn't crash, then the test is a success.
It's also possible to pass argument to rustdoc using compile-flags:
Run// compile-flags: --document-private-items
You put this comment at the top of the file and the arguments will be used when generating documentation (for this file). You can also specify the edition by using:
Run// edition: 2021
One final note: the XPATH we support is actually quite limited. We can't combine attributes:
//div[@id='...' and @class='...']Nor can we using more advanced things like:
//div[text()="bla"]`Unfortunately this is because of the standard python libraries we use: HTMLParser for the HTML and xml for the XPath. We didn't find a replacement that would be as lightweight and didn't rely on C libraries. So the situation isn't great, but this covers pretty much all our needs.
We currently have 765 rustdoc tests.
This test suite is testing the rustdoc "terminal output". It uses the same tools as rustc UI tests. So in here, we want to check that the warnings, errors and lints are emitted as expected. The tests are split in two parts: a .rs file and a .stderr file which contains the error output.
A test looks like this:
Run#![deny(rustdoc::intra_doc_link_resolution_failure)]
//~^ ERROR unknown lint
which will give in the .stderr file:
error: unknown lint: `rustdoc::intra_doc_link_resolution_failure`
  --> $DIR/unknown-renamed-lints.rs:1:9
   |
LL | #![deny(rustdoc::intra_doc_link_resolution_failure)]
   |         ^^^^^^^^^^^^^^^^^^^^^^^^^^^^^^^^^^^^^^^^^^

error: aborting due to previous error
The .stderr files can be generated automatically when running tests by using the --bless option. To generate them, we run rustdoc (or rustc) with --error-format=json which outputs (with our file):
{"message":"unknown lint: `rustdoc::intra_doc_link_resolution_failure`","code":{"code":"unknown_lints","explanation":null},"level":"warning","spans":[{"file_name":"foo.rs","byte_start":8,"byte_end":50,"line_start":1,"line_end":1,"column_start":9,"column_end":51,"is_primary":true,"text":[{"text":"#![deny(rustdoc::intra_doc_link_resolution_failure)]","highlight_start":9,"highlight_end":51}],"label":null,"suggested_replacement":null,"suggestion_applicability":null,"expansion":null}],"children":[{"message":"`#[warn(unknown_lints)]` on by default","code":null,"level":"note","spans":[],"children":[],"rendered":null}],"rendered":"warning: unknown lint: `rustdoc::intra_doc_link_resolution_failure`\n --> foo.rs:1:9\n  |\n1 | #![deny(rustdoc::intra_doc_link_resolution_failure)]\n  |         ^^^^^^^^^^^^^^^^^^^^^^^^^^^^^^^^^^^^^^^^^^\n  |\n  = note: `#[warn(unknown_lints)]` on by default\n\n"}
{"message":"1 warning emitted","code":null,"level":"warning","spans":[],"children":[],"rendered":"warning: 1 warning emitted\n\n"}
Based on that, we can re-create the actual error output and put it inside the .stderr file but without having to worry about the full path of the file (replaced with $DIR) or the error lines in the margin (replaced with LL).
So now that we know how the .stderr files are generated, let's go back to our file, and in particular to this comment:
Run//~^ ERROR unknown lint
~ indicates that we want to flag a warning or an error.
^ means "the line before this one" (and you can put ^ as many time as you want if it's multiple lines above). We could have put this comment on the same line of the error and then, no need to use ^.
ERROR is the level of the message you will get. It can be WARN too.
unknown lint is optional (but better to have it!) and is the start of the message.
Just like for rustdoc test suite, you can add more build options with the corresponding comments. If you want a full guide tour of ui tests, I recommend you to read the corresponding chapter in the rustc dev guide.
We currently have 249 rustdoc-ui tests.
I'm grouping both test suites because they actually work the same way. The only difference being that the rustdoc-js-std only runs tests on the std documentation.
So what are these test suites doing? They check the output of the rustdoc search feature. This is what rustdoc search looks like:
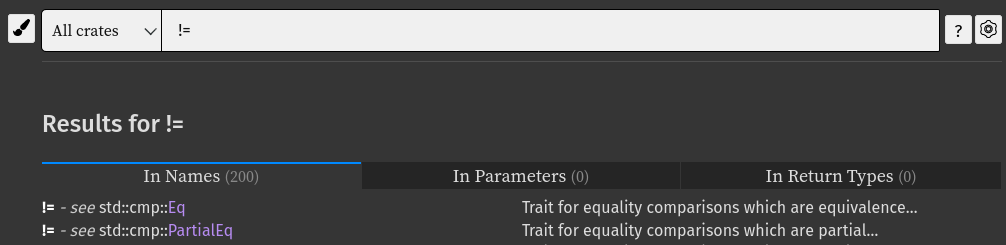
This search is performed without any server query. It's entirely done in JS with data it already has. It allows rustdoc generated pages to work locally without needing a server.
We need to ensure two things:
So a test file has a .js extension and looks like this:
const EXPECTED = [
    {
        query: 'String',
        others: [
            { path: 'std::string', name: 'String' },
            { path: 'std::ffi', name: 'CString' },
            { path: 'std::ffi', name: 'OsString' },
        ],
        in_args: [
            { path: 'std::str', name: 'eq' },
        ],
        returned: [
            { path: 'std::string::String', name: 'add' },
        ],
    },
];
Why JS you wonder? Explanations: since the parser is written in JS, we need the tester to also be written in JS to load it directly. And then, we just need to load the test file as well.
So back to the test content, there can be three different "global" variables:
EXPECTED contains checks for what the search outputs.PARSED contains checks for search engine state once it's done parsing.FILTER_CRATE allows to filter which crate we want the search to be run on. It's not used very often but it can be convenient in some cases.Then it works mostly the same for EXPECTED and PARSED: there is a query field which indicates what is the query to be performed. Then everything else is what is returned/generated. So in the test above, we check the equivalent of the three tabs: "Others", "In Parameters" and "In Return Types".
We currently have 104 rustdoc-js/rustdoc-js-std tests.
In case you didn't know: rustdoc can also generate documentation in JSON. This is an unstable option though, but it is being used by quite a few projects already. So as you might have guessed, this test suite ensures that the generated JSON is as expected.
Just like rustdoc-ui and rustdoc tests, they are written directly into the .rs file:
Run#![feature(no_core)]
#![no_core]

mod secret {
    pub struct Secret;
}

// @has "$.index[*][?(@.name=='get_secret')].inner.function"
// @is "$.index[*][?(@.name=='get_secret')].inner.function.decl.output.resolved_path.name" \"secret::Secret\"
pub fn get_secret() -> secret::Secret {
    secret::Secret
}
So one important thing to note, the use of:
Run#![feature(no_core)]
#![no_core]
The reason is simple, since all dependencies documentation is generated into the same file, it oftens make it harder to match exactly on what we want considering how huge core and std are (and also makes the JSON file much bigger). So we tend to remove all default dependencies in these tests.
Then for the checks themselves:
Run// @has "$.index[*][?(@.name=='get_secret')].inner.function"
// @is "$.index[*][?(@.name=='get_secret')].inner.function.decl.output.resolved_path.name" \"secret::Secret\"
The "command system" is the same as the rustdoc test suite: in a comment, you can put a command starting with @. Some commands (@has, @is, @count) can be negated with !, for example @!has. There is one big difference though: no need to give commands a file path as it's always the same: the JSON file path. Here is the list of existing commands:
@has: Checks that the (JSON) path matches at least one element. If you also provide a value, it checks that at least one element matching the (JSON) path has this value.@is: Checks that *exactly one* item matches the (JSON) path and that this item has the expected value.@ismany: Same as @is except you want N items to match both the (JSON) path the provided value.@count: Checks that the (JSON) path exists the number of occurrences provided.@set: Stores the value contained in the (JSON) path in a variable. You can then use this variable in commands that compare values (like @has or @is).We currently have 119 rustdoc-json tests.
This one isn't really used to test rustdoc since it checks that the links used in the std/core and all "default" crates provided by Rust have no dead links. However, we also rely on it when we change how intra-doc links are behaving.
To run it: ./x.py test src/tools/linkchecker/.
All this was written with the approval(?) of my cat: